Posted in Selenium

SelectorsHUB : A New Reality to build your own XPath & cssSelector quickly

Selector

Recently Sanjay Kumar Conducted a Poll to know the preferable way to create/fetch the Xpath and found 79% of people love to create XPath by own. So in the market, most of tool provide you the XPath directly and sometimes its fails when the website is too dynamic in Nature. So now we have an innovative tool with us, i.e. SelectorsHub a free community browser plugin to create and verify custom XPath with some advanced feature.
Some feature of Selector hub

  1. Attribute Autosuggest
  2. SVG Support
  3. Shadow Dom and iFrame support
  4. Error message with the missing elements
  5. Secure plugin

How to Install Selectors hub in chrome browser

Click on below link to install Selectors hub in your Chrome browser

https://chrome.google.com/webstore/detail/selectorshub/ndgimibanhlabgdgjcpbbndiehljcpfh/

Click on add to chrome >Add Extension

The selectors hub is now ready to use.
Steps to use the tool-

  1. Open Dev Tools.
  2. On right side, the last sidebar tab is Selectors Hub. Click on it. If not visible, expand the sidebar.
  3. Here in the Selectors box start typing your selector XPath/CSS selector.
  4. Selectors Hub will automatically suggest tagName, all attributes and everything to complete Selectors quickly. Now you need not to copy and paste attribute values from DOM anymore. With SelectorsHub you can save a huge amount of time.
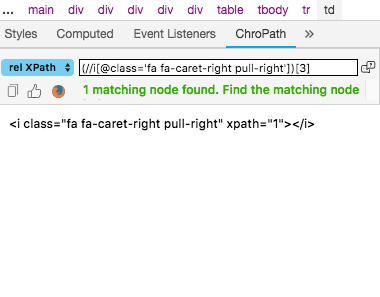
  5. After completing Selector just press enter and it will show the total number of matching elements.
  6. It will high light all matching node and list down them in the SelectorsHub tab.
  7. It will scroll the web element to viewable area if it is not in the viewable area.
  8. To copy selectors value, just double click anywhere in the box or click on XPath/CSS selector title box.


Now it support all the major browser like Chrome, Firefox, Edge, opera, Brave, Safari, chromium and Tor

For Detailed Workflow and complete tutorial please visit: https://www.selectorshub.com/what-is-selectorshub/

And for video Tutorial please visit: https://www.youtube.com/watch?v=NNTJyVb7P7U

Reference: https://www.selectorshub.com/what-is-selectorshub/

Keep Learning, Keep sharing..

Posted in Selenium

How Generate Random Test Data with ease in Automation Framework..

To verify some of the scenario we need random data in our Automation framework.I was using java.util.Random class to generate test data but to use Random class we have to create some custom methods and so many validation. Recently I found a solution to generate random data on the go without creating custom methods, I.e Faker Library

Coming Soon……

#famerlibrqry

Continue reading “How Generate Random Test Data with ease in Automation Framework..”
Posted in amazon, amazon aws, blogs

Amazon Honeycode(Beta) – Now Build Web & Mobile Apps Without Writing Code

Amazon AWS Introduce a new service to create Mobile and Web application without writing code(however the user should know basic Development so he can understand the terminology and function used in the application).

Honey Code is going to be great tool to create Web and mobile application.

It uses the familiar spreadsheet model and lets you get started in minutes. If you or your colleagues are already familiar with spreadsheets and formulas, you’ll be happy to hear that just about everything you know about sheets, tables, values, and formulas still applies.

Amazon Honeycode includes templates for some common applications that you and other members of your team can use right away

To know more about How it works please follow the link published by Amazon aws blog.

https://aws.amazon.com/blogs/aws/introducing-amazon-honeycode-build-web-mobile-apps-without-writing-code/

keep Learning,keep sharing, keep exploring.

Regards,

Abhishek Roy

Reference:aws.amazon.com

Posted in Automation Testing Tool, chrome, Selenium

Automate and Test your Web page in Chrome emulator and Chrome View point using selenium and Java.

Now a days most of the application/url having compatibility to open in responsive or in emulator,So lot of people worried how to open these url in chrome emulator or view point using Selenium and java.

So here is the solution,Please go through this code and verify your site in chrome emulator or in View point.

Prerequisite:

You should have Java8, Selenium 3.14 + Jar in your system.I already mentioned in previous blog how to set browser path.Link

Example 1.

To open Url in chrome Nexus emulator:

Here i am using Google page to open in chrome Iphone Emulator

package testEmulatorOnChrome;
/*
* prerequisite to run this code you need
* Java 8, Selenium 3.14 +, and chrome driver
* To download all these you can visit
*/

import java.util.HashMap;
import java.util.Map;

import org.openqa.selenium.By;
import org.openqa.selenium.WebDriver;
import org.openqa.selenium.chrome.ChromeDriver;
import org.openqa.selenium.chrome.ChromeOptions;

public class TestEmulatorChrome {
public static void main(String[] args) {
Map<String, String> mobileEmulation = new HashMap<>();

mobileEmulation.put(“deviceName”, “iPhone 5”); //You can use various device like iPad,iPhone,Nexus etc.
ChromeOptions chromeOptions = new ChromeOptions();
chromeOptions.setExperimentalOption(“mobileEmulation”, mobileEmulation);
System.setProperty(“webdriver.chrome.driver”,”D:\\Software\\chromedriver.exe”);
WebDriver driver = new ChromeDriver(chromeOptions);
driver.get(“https://www.google.com&#8221;);
driver.findElement(By.name(“q”)).sendKeys(“globallogic”);
driver.findElement(By.xpath(“//*[@id=\”tsf\”]/div[2]/div[1]/div[1]/button[2]”)).click();

}
}

Example 2:

To open Url in chrome View Point:

package testEmulatorOnChrome;
/*
* prerequisite to run this code you need
* Java 8, Selenium 3.14 +, and chrome driver
* To download all these you can visit
*/

import java.util.HashMap;
import java.util.Map;

import org.openqa.selenium.By;
import org.openqa.selenium.WebDriver;
import org.openqa.selenium.chrome.ChromeDriver;
import org.openqa.selenium.chrome.ChromeOptions;

public class TestMultibrowser2 {
public static void main(String[] args) {

Map<String, Object> deviceMetrics = new HashMap<>();
deviceMetrics.put(“width”, 360);
deviceMetrics.put(“height”, 640);
deviceMetrics.put(“pixelRatio”, 4.0);

Map<String, Object> mobileEmulation = new HashMap<>();
mobileEmulation.put(“deviceMetrics”, deviceMetrics);
ChromeOptions chromeOptions = new ChromeOptions(); chromeOptions.setExperimentalOption(“mobileEmulation”, mobileEmulation);
System.setProperty(“webdriver.chrome.driver”,”D:\\Software\\chromedriver.exe”);
WebDriver driver = new ChromeDriver(chromeOptions);
driver.get(“https://www.google.com&#8221;);
driver.findElement(By.name(“q”)).sendKeys(“globallogic”);
driver.findElement(By.name(“btnK”)).submit();

}
}

In case you find difficulty please let me know,


Here are some list of device you can use in this code..

Thanks, Keep learning New things….

Abhishek

Posted in Automation Testing Tool, blogs, chrome, Selenium

WebDriverManager :A solution to Launch the browser in selenium framework without setup of local path

To run automation script we have to set executable file path to launch any browser,Here i found some solution  i.e WebDrivermanager. By using this you don’t have to set executable path to launch the browser.

For this We have to use WebDriverManager as Java dependency to Pom.xml file to launch the Desired browser.

The Dependencies are:

<dependencies>
<!– https://mvnrepository.com/artifact/org.seleniumhq.selenium/selenium-java –>
<dependency>
<groupId>org.seleniumhq.selenium</groupId>
<artifactId>selenium-java</artifactId>
<version>3.141.0</version>
</dependency>

<!– https://mvnrepository.com/artifact/io.github.bonigarcia/webdrivermanager –>
<dependency>
<groupId>io.github.bonigarcia</groupId>
<artifactId>webdrivermanager</artifactId>
<version>3.1.0</version>
</dependency>

<!– https://mvnrepository.com/artifact/org.testng/testng –>
<dependency>
<groupId>org.testng</groupId>
<artifactId>testng</artifactId>
<version>6.14.3</version>
<scope>test</scope>
</dependency>

<!– https://mvnrepository.com/artifact/com.google.guava/guava –>
<dependency>
<groupId>com.google.guava</groupId>
<artifactId>guava</artifactId>
<version>23.0</version>
</dependency>

<dependency>
<groupId>org.apache.httpcomponents</groupId>
<artifactId>httpclient</artifactId>
<version>4.5.3</version>
</dependency>
</dependencies>

The sample Program file is

package com.Demo.webDriverManager;

import io.github.bonigarcia.wdm.WebDriverManager;
import org.openqa.selenium.WebDriver;
import org.openqa.selenium.chrome.ChromeDriver;
import org.openqa.selenium.firefox.FirefoxDriver;
import org.testng.Assert;
import org.testng.annotations.AfterClass;
import org.testng.annotations.BeforeClass;
import org.testng.annotations.Test;

public class DemoTest {

private WebDriver driver;

@BeforeClass
public void setUp() {
WebDriverManager.chromedriver().setup();
driver = new ChromeDriver();
}
/* WebDriverManager.firefoxdriver().setup();
driver = new FirefoxDriver();
}*/

@Test
public void TestWebDriverManager() throws InterruptedException {
driver.get(“https://automationtesting365.wordpress.com/author/automationtesting365/”);
Assert.assertTrue(driver.getTitle().contains(“automationtesting365”), “Test Failed”);
System.out.println(“WebDriver Manager demo Test successsfully executed”);
}

@AfterClass
public void tearDown() {
if(driver!=null)
driver.quit();
}
}

  • WebDriverManager resolves the driver binaries for the browsers Chrome, Firefox, Opera, PhantomJS, Microsoft Edge, and Internet Explorer. For that, it provides several drivers managers for these browsers. These drivers managers can be used as follows:

WebDriverManager.chromedriver().setup();
WebDriverManager.firefoxdriver().setup();
WebDriverManager.operadriver().setup();
WebDriverManager.phantomjs().setup();
WebDriverManager.edgedriver().setup();
WebDriverManager.iedriver().setup();

  • To set Specific version of browser version you can use:

WebDriverManager.chromedriver().version(“2.40”).setup();


NOTE: The old WebDriverManager API (version 1.x) has been deprecated as of version 3.x 

For More about WebDriverManager you can visit

https://github.com/bonigarcia/webdrivermanager

Reference:https://github.com/bonigarcia/webdrivermanager

https://dzone.com/articles/webdrivermanager-to-manage-browser-drivers-easily.


Posted in Automation Testing Tool, Selenium

JUnit 4 vs JUnit 5:An Overview

Junit5

JUnit5, the Next Generation Junit. A Regression Testing Framework used by developers and tester to implement unit and functional testing in Java and Selenium, to accelerate programming speed and increase the quality of code. JUnit Framework can be easily integrated with either of the following –Eclipse, Ant, Maven. Junit5 introduces New Assert and Annotations to test your code more efficiently.

Junit5 requires Java 8 and above Java version and some useful annotations are:

@ParameterizedTest: Denotes that a method is a parameterized test. Such methods are inherited unless they are overridden.


@RepeatedTest: Denotes that a method is a test template for a repeated test. Such methods are inherited unless they are overridden.

@DisplayName: Declares a custom display name for the test class or test method. Such annotations are not inherited.

@BeforeEach: Denotes that the annotated method should be execute before each @Test,@RepeatedTest, @ParameteizedTest or @Test Factory method in the current class; analogous to JUnit 4’s @Before. Such methods are inherited unless they are overridden.

@AfterEach: Denotes that the annotated method should be executed after  @Test

@AfterAll:Denotes that the annotated method should be executed after @RepeatedTest@ParameterizedTest, and @TestFactory methods in the current class; analogous to JUnit 4’s @AfterClass. Such methods are inherited (unless they are hidden or overridden) and must be static (unless the “per-class” test instance lifecycle is used).

@Tag: Used to declare tags for filtering tests, either at the class or method level; analogous to test groups in TestNG or Categories in JUnit 4. Such annotations are inherited at the class level but not at the method level.

Screen Shot 2018-08-07 at 4.12.22 PM

Asserts in Junit:

Screen Shot 2018-08-07 at 4.13.42 PM

For More Information you may visit JUnit Official site Click here and For comparison with JUnit 4 you may visit click here

Reference:https://junit.org/junit5/docs/current/user-guide/

Posted in Selenium

ChroPath: An Alternative Add on to FirePath and Xpath finder

As we all know in Firebug and Firepath is deprecatede with New version Firefox ,And its very difficut to verify your customized xpath in current version firefox.

So Finally i found a solution for this i.e “ChroPath

[EDIT:Now the chropath is available for Firefox,chrome,opera and Edge browser and version 6.0 having various feature like record the steps,get all xpath altogether in csv file,get xpath using desired attribute and many more.As lots of tutorial and blogs are available so will share the link of the blogs and tutorials in this post itself https://medium.com/@mailcoolsanjay/what-are-the-unique-innovation-in-autonomiq-chropath-6-0-version-2b1b1984a4c8]

About this extension:

ChroPath is a developer tool, which is used to edit, inspect and generate relative xpath, absolute xpath and CSS selectors. ChroPath makes it easy to write, edit, extract, and evaluate XPath queries on any webpage. ChroPath is the only tool for now which provide the unique Relative xpath and CSS selector for any web element in webpage in Firefox and Chrome. ChroPath is very good alternative for Firebug and Xpath Finder.

Screen Shot 2018-07-16 at 12.10.13 PM

Screen Shot 2018-08-08 at 10.34.30 AM

The link for Chrome browser-
https://chrome.google.com/webstore/detail/chropath/ljngjbnaijcbncmcnjfhigebomdlkcjo?hl=en

The link for Firefox browser-

https://addons.mozilla.org/en-US/firefox/addon/chropath-for-firefox/

How to use ChroPath –

  1. Right-click on the web page, and then click Inspect
  2. In devtools panel click on ChroPath tab.
  3. Click on ChroPath tab and click on selector to Select the Type of Selector.
  4. Click on Select Element button and hover to the element , You can observer the Xpath or CSS As per your selection
  5. Now if you want to see the all node of the page write // node name and enter, Eg://div
  6. Now you can create Xpath as per your requirement
  7. You can verify the xpath by clicking enter.

Note:
1- Click again on inspect to disable the inspect action.
2- Tool will add xpath/css attribute to all the matching node(s) as per their sequential occurrence. For example, a matching node appearing second in the list will have xpath=2. And if verifying CSS then it will add css=2.

Ref: From the post of Sanjay Kumar(Medium.com)

Posted in Automation Testing Tool

Katalon Studio:An open source Automation tool

Katalon Studio is a comprehensive toolset for web and mobile app automation testing. This tool includes powerful features that help overcome common challenges in web UI test automation, for example, window popup, frames, wait, dropdown and many more inbuilt functions. This is user-friendly and help tester in automation to create regression suit better and faster even without prior knowledge of Scripting.

The tool is open source and can be downloaded at https://www.katalon.com.

Feature:

Katalon Studio is open source framework which comes with some advanced inbuild feature, Some of advanced feature are:

  • Support Web and mobile testing
  • Integrated with Restful and soup web services
  • You can pull test cases from JIRA
  • Inbuilt GIT repository support
  • Data management is very easy it support excel, database data,csv data and internal data.
  • Record and play funtionality
  • Even without prior knowledge of script you can create test cases.
  • User friendly
  • Suports groovy
  • Inbuilt functions

 Setup Katalon Studio in mac:

1.Redirected to https://www.katalon.com

2.Sign up for katalon studio

3.Download the .dmg file for mac

4.Install the package in Application folder

5.Open katalon studio enter userid and password and create a new project

6.Create new test case.

7.Record the test steps by clicking web recording button,after clicking the recording button a pop up will open(You can write the test script in groovy too)

8.Provide the test url and select the desired browser and click in browser icon.

9.After performing steps click on ok button

10.you will find test steps in created test case file

11.Execute the test case after selecting browser.

Note:You can insert assert or condition statement by adding Assert statement and decision making statement in test steps

[This is the basic steps of katalon studio,you can perform varios automation related activity using this powerful automation tool.]

Please let me know if you having any query related to this,For more you can visit

https://www.katalon.com/katalon-studio/

Thanks

Abhishek Roy

Posted in Automation Testing Tool, Deprecated, Selenium

WebDriver Locator Plug-In to find Xpath with WebDriver script in Desired Programming Language.

WebDriver Locator Plug-in

Screen Shot 2018-08-08 at 10.30.13 AM.png


To locate Element from page may tricky for New User, and it can be extremely time consuming to manually check the html for every element to construct their locators in a site with hundreds if not thousands of unique testable elements. So to overcome with this problem there is plug-in which allow us to concentrate on writing valuable tests rather than worrying about the list of elements yet to locate.

Introduction:

WebDriver Locator Plug-in is a Firefox plug-in and it can be used not only to generate xpath locator for the web element which are displaying on page but also to generate WebDriver script in desired programming languages.

Why to use WebDriver Locator plug-In:

There are lots of ads on available for Firefox to find Locator from Webpage so the question may arise why we are using WebDriver Locator Plug-In:

  • To find xpath is more Easy than firebug and firepath.
  • It generates WebDriver script along with Xpath in various programming languages so it by using this you can save you time for on writing valuable tests rather than worrying about the list of elements yet to locate

Installation:

1.Open Firefox browser and Navigate to https://addons.mozilla.org/.and search WebDriver Locator Plug-In

2.Click on continue to download button present on the page.

 3.Click on Add to Firefox option button present on the page. 

 4.Click on install.

 5.Click on ok.


How to use WebDriver Locator Plug-in

1.Launch Firefox browser and browse any web application.

2.Right Click on any web Element to find the locator and observe a additional option related to WebDriver Locator  click on the desired Language locator


3.Open Notepad and paste the locator and use it in your Script you can observe Xpath Locator along with Seelenium WebDriver Code In java got passed into notepad editor.


Conclusion:

WebDriver Locator not only suggests the best Xpath Locator but also generate Selenium Script in your Desired Language to speed up the process of Test Case Writing.

[PS:This plug in is not compatible with new version of firefox instead of this you can use Chropath plugin for more you can visit my post on chropath

Thanks

Abhishek Roy

Sr.Test Engineer